Learn How to Fade Audio in Premiere With Detailed Step-by-Step Guide
Fading audio is a fundamental skill for any video editor working in Adobe Premiere. Understanding how to fade audio in Premiere is an important skill to create a smooth transition between audio clips, soften the start or end of a sound, or even make dialogue or background music seamlessly blend with other audio elements. Within this detailed guide, we'll walk you through fading audio in such applications, covering everything from simple fade-in and fade-out effects to more advanced techniques using keyframes. Lastly, we will explore common scenarios where you typically use audio fading.

Part 1: How to Fade In/Out Audio in Premiere
Audio Premiere is a powerful video editor tool that professionals and beginners widely use. One of the key features of this amazing application is the ability to manage audio tracks effectively, which includes fading audio in and out. Fading audio is crucial for creating smooth transitions between scenes, reducing abrupt audio starts or stops, and setting the appropriate mood for your video project. Whether you want to edit a YouTube video, a film, or a podcast, learning how to fade in audio in Premiere will greatly enhance the quality of your video.
Step 1The first thing you want to do is to open the app. After opening the app, import your audio file by clicking the File > Import button or simply drag and drop the files into the application interface.
Step 2After you have imported the audio file, make sure you drag the audio file into the right timeline. Then, you can go to the Effects panel and navigate to Audio Transitions > Crossfade. Choose Constant Grain, Constant Power, or Exponential Fade, and drag the effect to the start or end of the audio clip.
Step 3After applying the effects, adjust the effect duration. Do that by clicking on the applied transition effect. Then, use the Effect Controls panel to change the duration of the fade by dragging the transition edges.
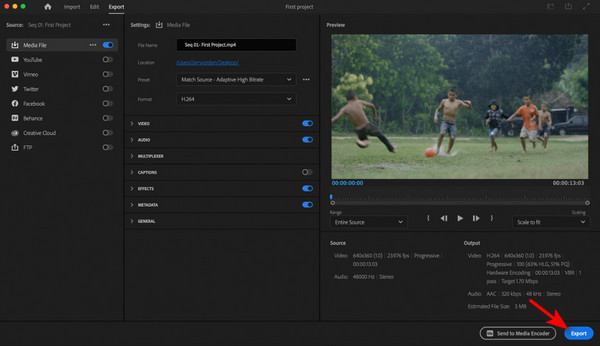
Step 4After applying and adjusting the fading effects, ensure no errors with the audio clip by previewing the clip. After you have checked for errors, you can export the audio.

Part 2: 2 Easier Alternative to Premiere to Fade In/Out Audio
Tipard Video Converter Ultimate
Tipard Video Converter Ultimate is a versatile tool that offers a more user-friendly interface for beginners who want to fade audio. It supports multiple file formats and provides beginners who want to fade in audio. It supports multiple file formats and gives users an easy drag-and-drop feature to apply audio effects, including fade-in and fade-out, without the complexity of professional editing softwares. This software is perfect for those who require quick and straightforward audio editing and could help users learn how to fade out in audio.
Step 1Acquire and Launch App
Download the application if you haven't already done so. Click the download button given below. Launch the application after the installation. Launch it by clicking the app available on your desktop.
Step 2Import Audio File
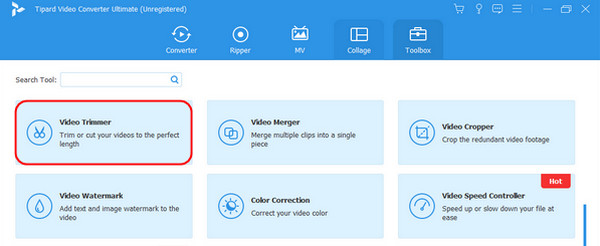
After launching the app, you will be introduced to the main interface. Click on the Toolbox option on the top side of the app and search for Video Trimmer. After you have clicked the Video Trimmer tool, you will see a big + button. Click the + button to import the audio file.

Step 3Set Fade Effect
After importing the audio file, you can add fade effects to your audio. Simply click the Fade-in and Fade-out button below the audio timeline. You can also toggle and adjust the duration of the fade effect by adjusting its variable.

Step 4Export Audio
You can start the exportation process if you are satisfied with your audio file. Click the Export button on the bottom-right of the application to export. Remember that your exported file will be saved in the app's local directory.

Audacity
Audacity is a free and open-source audio editing software perfect for users looking for a simpler alternative to Premiere. It lets you easily import audio files and apply fade effects using intuitive controls. Audacity also offers advanced features for more detailed audio editing, making it an excellent choice for users at all skill levels. Remember that to use advanced features, you must buy its Pro version.
Step 1The first step you will take is to launch the app if you have it installed. Then, go to File > Open to import your audio file or simply drag and drop the audio file into the Audacity window.
Step 2Then, you will want to use the Selection Tool to click and drag over the audio waveform portion where you want the fade effect to be applied. To fade in, select the beginning of the audio clip; to fade out, select the end.
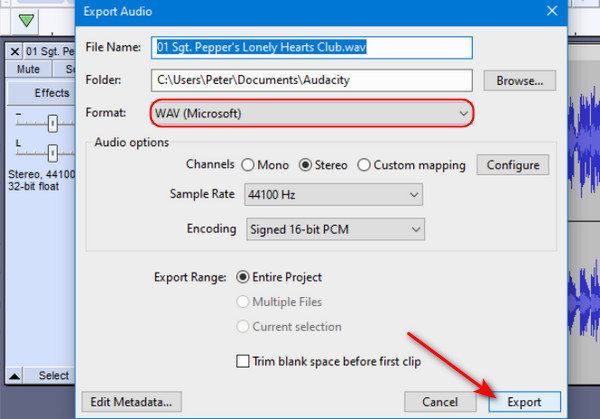
Step 3Once you are satisfied with the effect, it is time to export the audio clip. Click File > Export and choose your desired format.

Further Reading:
How to Sync Audio and Video on Premiere Pro Using 3 Easy Methods
3 Ways to Increase Your Video Speed in Adobe Premiere Pro
Part 3: Why Do You Need to Fade In/Out Audio in Premiere
Fading audio in and out is a fundamental technique in video and audio editing, and understanding its importance is crucial for anyone working with media content. Here are the reasons why you need to master such a technique:
Creating Smooth Transitions
Transitions are vital to maintaining a seamless flow between scenes when editing videos. Sudden cuts in audio can be jarring to the audience, breaking the immersion. However, with fading in and out audio, we can soften the transitions, allowing the viewers to move smoothly from scene one to scene two without sudden changes.
Establishing the Right Mood
Audio plays a significant role in setting the mood of the scene. A soft fade-in can gradually introduce music or background sound, subtly preparing the audience for what will happen. For example, a slow fade-in of suspenseful music can create tension, while a gradual fade-out can signify the end of a scene.
Enhancing Professional Quality
Professional video production often involves multiple audio layers, including dialogue, music and sound effects. Fade audio helps balance these layers, ensuring they do not overpower each element.
Reducing Background Noise
In many cases, audio recordings may contain unwanted background noise. Fading out audio at the end of a dialogue or a scene can help reduce these unwanted noises, which makes the main audio clear and unobstructed. This is useful for projects involving many audio sources, such as interviews or live events.
Conclusion
After that, you have learned how to fade out audio in Premiere. We hope that you retain and master the skills we have taught you. If you have forgotten any skills, we recommend returning to this article to refresh your memory.


