How to Use QuickTime Screen Recording: Learn the Easiest Way
Users nowadays are having trouble recording their screens using Mac and Windows. They find it difficult since they don't have enough idea about the methods they need to do. Screen recording is one of the best ways to back up data, record presentations, create tutorials, and more. So, if you want to record your screen using Mac and Windows, then this guidepost might be helpful for you. We will show you the method of recording screen with QuickTime. Also, you will discover another alternative you can use. This way, numerous options will be given to you. If you want to record your screen instantly, read this article to find out.
Part 1. How to Record Screen Using QuickTime
When using Mac, QuickTime is one of the popular video players you can use to play videos. But playing videos is not the only thing it can offer. QuickTime is also capable of recording your screen. This way, you can use this program if you are a vlogger, instructor, player, and more to record your screen. In addition, not only video, but QuickTime also allows you to record your audio, making it more convenient for users. Moreover, when recording your screen, you can choose if you want to record your entire screen or some part of the screen. Furthermore, in terms of utilization, QuickTime is easy to operate. It has an intuitive interface with simple options, which is perfect for all users.
.This program is also a built-in software. Meaning to say, you don't need to install the screen recorder on your Mac. Also, besides video recording and playing videos, one of its features is editing your videos. The program allows you to do a simple editing process on your videos to make them better. However, you can encounter some problems using QuickTime when recording your screen. There are times when the screen recording freezes. Maybe you have a low RAM on Mac. Some users failed to record because the program was unable to record. But if you want to record the screen with QuickTime, follow the instructions below.
Step 1Open your Mac and launch QuickTime. To open the program, navigate to the Finder icon and click it. Afterward, go to the Application option on the left side of the interface. Then select the QuickTime Player.
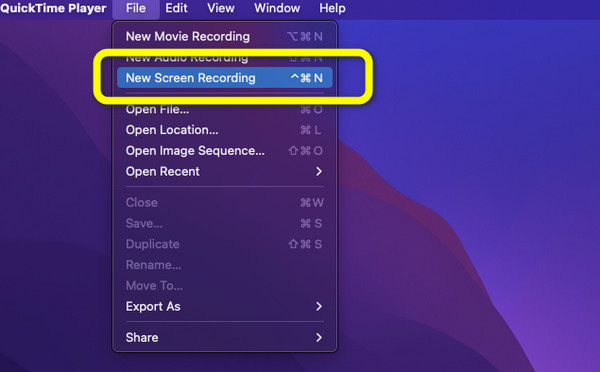
Step 2Next is to navigate to the File option on the upper left part of the screen. Then select the New Screen Recording option.
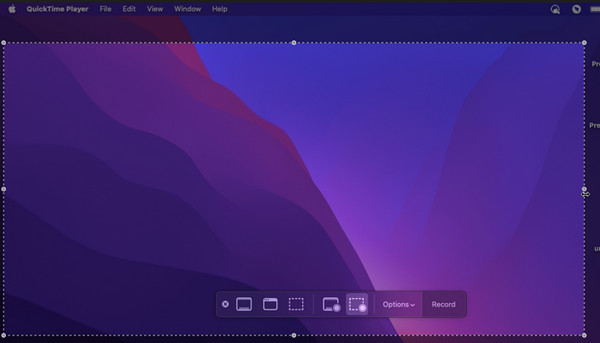
Step 3After that, you can choose how you want to record your screen. The options are Record Entire Screen and Record Selected Portion. When you are done choosing, click the Record button.
Part 2. How to Get QuickTime Player to Record Internal Audio
We have the best method for you if you want to record internal audio while recording your screen. If you desire to learn the best way to record internal audio, use the steps given below.
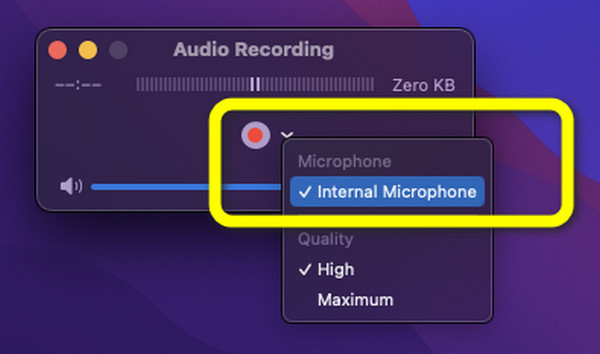
Step 1Launch the QuickTime Player on your Mac. Then, Go to the File menu and select New Audio Recording.
Step 2Then when the small interface appears on your screen, click the dropdown button. After that, click the Internal Microphone option. Lastly, click the red button to start. Then you can proceed to record your screen.
Part 3. How to Stop QuickTime Screen Recording
The first part taught you how to screen record using QuickTime. In this part, you will learn how to end QuickTime screen recording. After stopping the video, we will also proceed to save the recorded video on your screen.
Step 1When you are finished recording your screen, navigate to the upper part of your Mac screen. Then, you will see the Stop button. Click it to stop the screen recording.

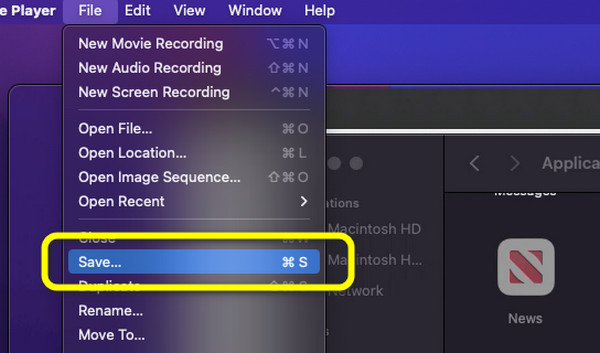
Step 2After that, your recorded screen will pop up on your screen after clicking the Stop button. If you are satisfied, go to the File menu and click it. Then, select the Save as option. This way, you can save your recorded video on your Mac.
Part 4. Best Alternative to QuickTime
If you are looking for an alternative way of QuickTime screen capture to record your screen on Mac, use Tipard Screen Capture. This is the best alternative for QuickTime. In addition, it has more manageable steps for recording your screen than QuickTime. Also, the interface of this program is more understandable than the other one. Tipard Screen Capture is also available on both Windows and Mac, making it more accessible. Moreover, it is free to download. This offline program is perfect when making tutorials, recording a presentation, backing up videos, and more. One of the best features of this screen recorder is that you can record audio while recording your screen. This way, you can speak without worrying if the tool can detect your voice while recording. We prepared the steps you can follow if you want to use Tipard Screen Capture to record your screen. See the steps below and start recording your screen.
Step 1Download Tipard Screen Capture on your Windows or Mac. Click the Download button below and install it on your Mac computer. Then, launch the program.
Step 2When the interface already shows up, navigate to the left part interface and click the Video Recorder option. After that, an adjustable frame will appear on the screen. Then adjust it based on how you want to record your screen. You can also record the entire screen.

Step 3Click the REC button on the right part interface to start the screen recording process. A Three seconds countdown will show up first before starting the screen recording. After that, click the Stop button when you want to finish recording your screen.

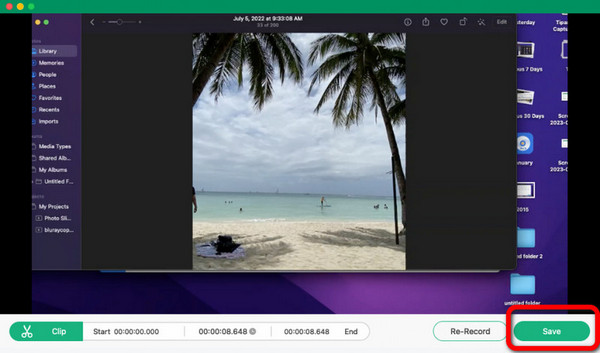
Step 4After clicking the Stop button, the recorded video will show up on the screen. To save your final output, click the Save button.
Part 5. FAQs about QuickTime Screen Recorder
1. What are the common QuickTime recording errors and fixes?
There are some instances when QuickTime stops working suddenly for some reason. Also, the screen recording freezes. Another problem you can encounter is the program can't record the screen. There are many solutions you can consider when having these problems. Ensure that you have enough storage or RAM on your device.
2. Can I install QuickTime Player on Windows 10?
Yes, you can. QuickTime is available on Windows. However, based on the research, Apple stopped supporting it. When doing a screen recording, the audio is not available.
3. How to use QuickTime as an iOS screen recorder?
You can connect your iOS device to your Mac using a USB cable. Then, launch QuickTime on Mac. Navigate to File and click New Movie Recording. On the new window, click the downward button. After that, select the iPhone for video and audio recording, and click the Record button to start the screen recording. When you finish recording, click the Stop button. Lastly, click the Export button.
Conclusion
With all the information in this article, you learned the best way to use QuickTime for screen recording with audio. Also, besides QuickTime, the post introduced you to the best alternative you can use when recording your screen. So, if you are looking for the best screen recorder aside from QuickTime, use Tipard Screen Capture. The program allows you to record your video and audio without errors.


