Welcome to the world of copying DVDs to your computer's hard drive! Why should you consider this? Copying a DVD to your computer's hard drive is brilliant for several reasons. It's like creating a digital backup of your favorite movies or shows, making them easily accessible without dealing with physical DVDs. This process is beneficial for preserving your collection, enhancing convenience, and ensuring you can enjoy your content on various devices.
This article will provide a dependable tool to help you effortlessly copy DVDs to hard drives. Moreover, it will present some tips and tricks for copying DVDs to the hard drive, which can be helpful for you.

Part 1. How to Copy DVD to Hard Drive with the Least Operation
Not all devices come equipped with DVD drives. Copying DVDs to your hard drive expands playback options, enabling you to enjoy your content on various devices, including those without built-in DVD drives.
Tipard DVD Ripper is your reliable companion for copying DVDs to hard drives for the following reasons:
- • It boasts an interface designed for simplicity.
- • Navigating through the tool is easy, which makes the DVD copying process accessible to users of all experience levels.
- • Whether you prefer MP4, AVI, MKV, or other formats, Tipard DVD Ripper supports countless output formats. Pick the best playback device that suits you.
- • It lets you customize the output settings based on your requirements. You can tailor the video and audio settings to get your desired outcome.
- • It is designed for efficiency. You can experience high-speed ripping that gets the job done swiftly while maintaining the quality of your content.
Step 1First, download and install Tipard DVD Ripper on your computer from the official website or by pressing the button below.
Step 2Place your DVD into the computer's DVD drive. If your computer has no built-in DVD drive, use an external one. Also, ensure your hard drive is connected to the computer.
Step 3Launch the program to start doing your task. Click the Load DVD drop-down menu and select your importing section to import your DVD content. It will take a few seconds to finish the loading process.
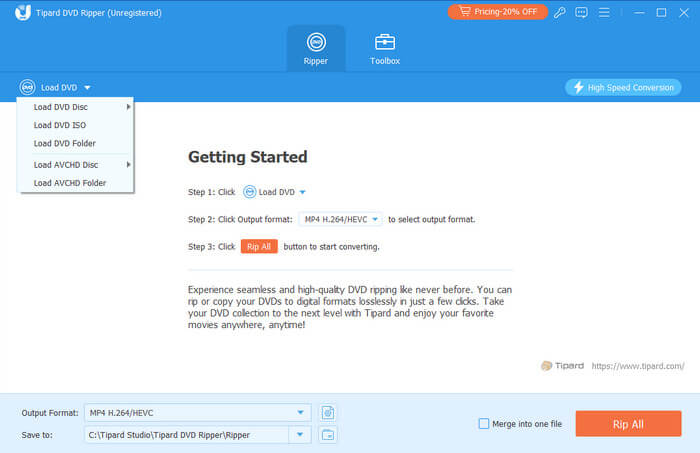
Step 4Click the Output Format menu in the bottom left corner to open the output format section. To play DVDs on your computer hard drive, you need to select a format that is compatible with your media player.
To copy DVDs to another hard drive or device, select the most popular format - MP4. This format is compatible with almost all devices that you should use.
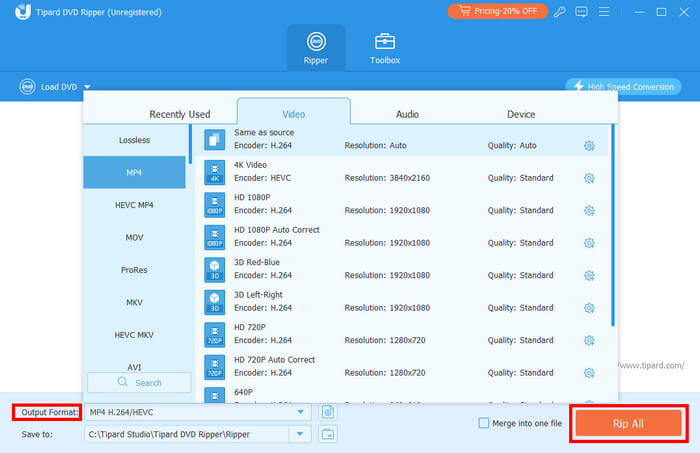
Step 5Change the output folder at the left corner to the directory folder of your hard drive. After that, click the Rip All button to start copying the DVD to the hard drive.
Part 2. Transfer DVD to Hard Drive using VLC Media Player
VLC is a free media player with an intuitive interface and powerful multimedia file-playing feature. It can not only play a variety of video or audio formats but also can easily convert DVDs to AVI, MP4, WebM, TS, etc. However, you should notice that it cannot export ISO images or the VIDEO_TS folder.
The steps are below:
Step 1 Download the VLC media player on your computer. Run it after installation.
Step 2 Place your DVD into the computer's DVD drive.
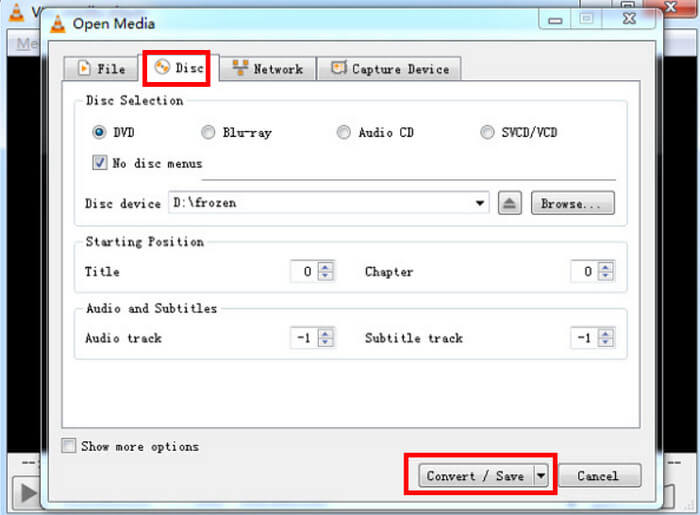
Step 3 Go to VLC and click the Media option in the top left corner of the main interface. Select Convert/Save... and choose Disc afterward. You can also choose the title, audio and subtitle on this page. Then, tap Convert / Save.
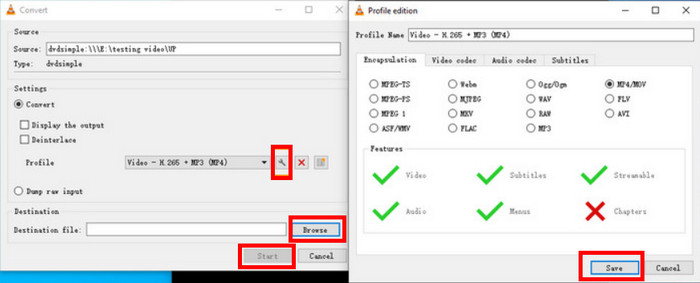
Step 4 Choose the format for your output video on the pop-up window by clicking the wrench-like pattern after Profile. Then, click Save to save your settings. Then, you can click Browse after the Destination file to choose the path for the video. Click Start to begin copying the DVD to the hard drive.
Part 3. Save DVD to Hard Drive with MakeMKV
MakeMKV enables you to convert DVD to a MKV file and save it to your hard drive on the computer. But you should know that the result MKV file is large in size, you need to compress a video additionally.
Here are the steps:
Step 1Download and install MakeMKV on your computer.
Step 2Place your DVD into the computer's DVD drive.
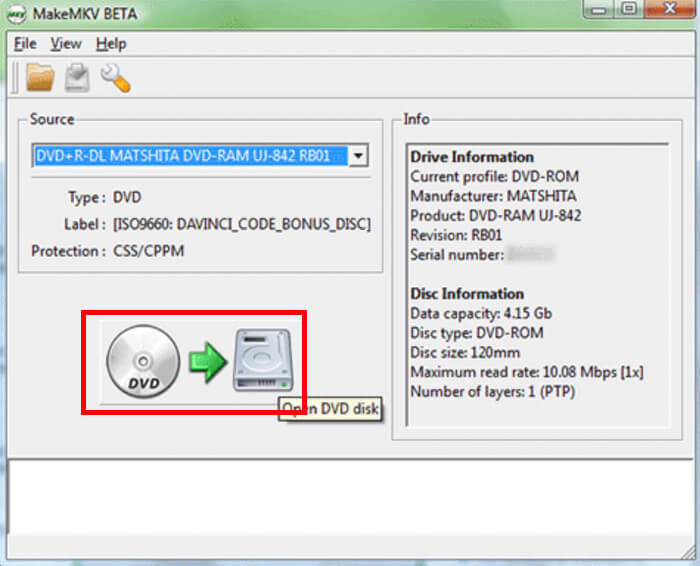
Step 3Go to MakeMKV and click the picture below the page to open DVD disk.
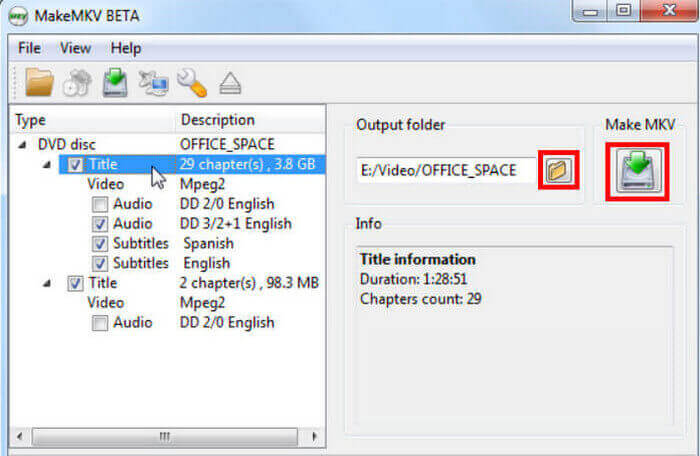
Step 4You need to choose the title, audio, and subtitle tracks you want to copy on the following page. Then, on the right page, you need to select your hard drive in the Output folder option to save the digital copy of your DVD. Then, click Make MKV to start.
Part 4. Burn DVD to Hard Drive via Handbrake
Handbrake is a free DVD ripper among Windows, Mac, and Linux. It can not only transcode videos, but also convert DVD files to MP4, MKV, and WebM for backup on a hard drive. However, you need to notice that it should work with VLC libdvdcss and its native DVD transcoding will result in quality degrading. You need to improve the video quality additionally.
Here are the steps:
Step 1 Download and install HandBrake on your computer. What's more, you need to install libdvdcss on your computer as well.
Step 2 Open the Handbrake and load the DVD from the Source Selection. It takes time.
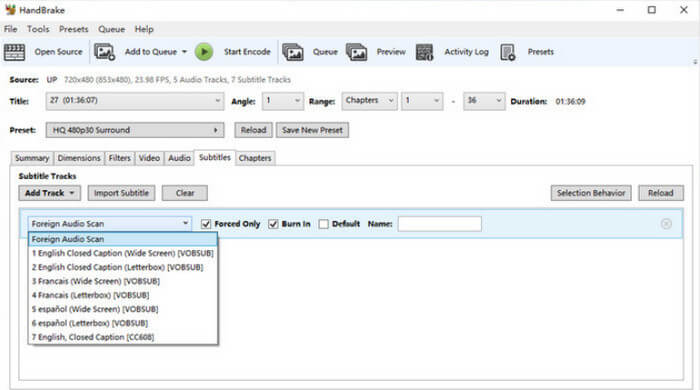
Step 3 You can choose the title, angle, range, chapter, preset, and subtitle of the video to be copied.
Step 4 After selection, click Browse to choose the saving path and then click Start Encode to start the process.
Part 5. Tips & Tricks for Copying DVDs to Hard Drive
Copying DVDs to your computer's hard drive can be easy and handy. Here are some simple tips and tricks to make the process smooth and fast. Whether you want to save space, organize your movie collection, or enjoy your DVDs without the discs, these tips will help!
1. Choose the Right Format
Select a format compatible with your playback device. MP4 is a widely supported format, ensuring your copied DVDs can be played on various devices smoothly.
2. Fast Transferring Methods
Use USB 3.0 or higher ports to transfer files directly to an external hard drive. It will speed up the copying process compared to older USB versions.
3. Adjust Video Quality
Consider balancing the video quality and file size. Lowering the video quality can reduce file size, allowing you to fit more content on your hard drive without sacrificing visual clarity.
4. Backup Your Copies
Consider backing up your copied DVDs on an external hard drive or cloud storage. It comes with an additional layer of protection against accidental loss or damage.
5. Remove Unnecessary Content
Before copying, check if your DVD ripper allows you to exclude unnecessary content like trailers, menus, or bonus features. It not only saves space but also streamlines your digital collection.
6. Organize Your Files
Create folders on your hard drive to organize your copied DVDs. It makes it easier to locate specific movies or shows when you want to watch them.
7. Test Your Copies
After copying, play a few files to ensure they work correctly. It helps catch any issues early on and ensures a smooth playback experience when you want to enjoy your content.
8. Check for Copyright Protection
Some DVDs have copy protection. Ensure your DVD ripper tool can handle or bypass such protection to avoid any issues during copying.
Conclusion
Saving favorite movies or TV shows directly to a computer is a handy way to enjoy them without DVDs. Tipard DVD Ripper is the fastest way to copy DVD to a hard drive. Besides helping you rip DVDs to hard drives, it also lets you customize the video output. Go and have a Try!


