How to Add GIFs to Google Slides while Keeping the Animation
Today, there are more and more web-based and cloud-based services, which help you perform various tasks without installing any software. Google Slides, for example, is a presentation tool that enables you to make presentations online. You can add images and videos to a slide. Don't you want to add GIFs to Google Slides to make your presentation more interesting? However, users complained that it is challenging to use GIFs in their presentations. Therefore, this guide will talk about how to add and insert GIFs into Google Slides in different situations correctly.

Part 1: How to Add a GIF to Google Slides
Google Slides does support the GIF image format. Plus, there is no image size or limit. Of course, it takes time to upload and display large GIFs on Google Slides, depending on your internet condition. You can add a GIF to Google Slides from URL, your computer, and Google Drive.
How to Add a GIF to Google Slides from URL
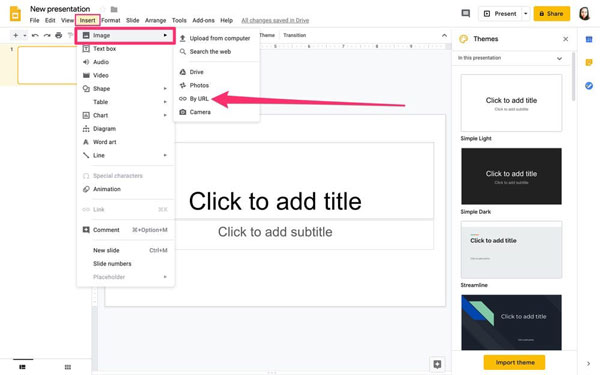
Step 1If you intend to insert an online GIF into Google Slides, copy the image address to your clipboard. Find a GIF on the website or search engine, right-click on the image and select the Copy Image Address option.
Step 2Run Google Slides in a browser, sign in your account, and open the desired presentation.
Step 3Pull down the Insert menu, choose the Image, and then By URL. When prompted, paste the GIF address into the field and click the Insert button.
Step 4Then you can resize and change the GIF position.
How to Insert a GIF to Google Slides from Computer
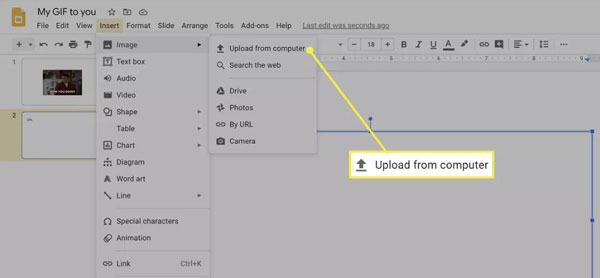
Step 1To insert a local GIF to Google Slides, open the target presentation in your browser.
Step 2Go to the Insert menu, choose the Image option, and select Upload from computer.
Step 3Find the GIF image on your computer and select it, and click the Open button.
Note: Some people reported that their GIFs on Google Slides added from computers did not work. In such cases, you have to convert the GIF in question to the MP4 format.
How to Add a GIF to Google Slides from Google Drive
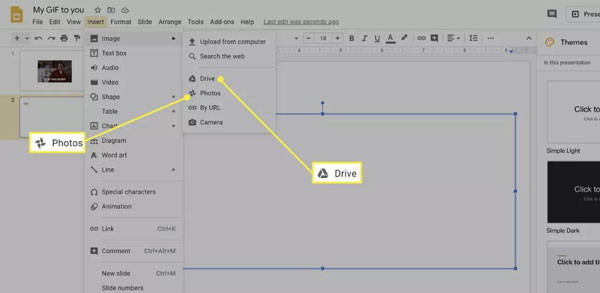
Step 1Google Slides also supports Google Drive or Google Photos as the GIF input source. Locate the slide where you want to add a GIF.
Step 2Head to the Insert menu, select the Image option and choose Drive or Photos according to your condition.
Step 3Next, find and select the GIF or GIFs in the right rail, and click the Insert button.
Note: You need to upload the GIFs that you want to use in Google Slides to Google Drive or Google Photos before inserting.
Part 2: How to Compress, Crop, and Trim a GIF for Google Slides
Sometimes, you need to edit the GIFs before adding them to Google Slides. For example, a GIF is too large to insert into a slide online, you just want to use a part or a clip of the GIF in your presentation, etc. Tipard Video Converter Ultimate is just the tool that you need. It is able to edit or even create an animated GIF from a video or a photo series, and then you can add the GIF to your Google Slides. It is able to create an animated GIF from a video or a photo series. Moreover, the clear interface allows you to find what you want quickly.
Main Features of the Best GIF Editor
- 1. Compress, crop, and trim a GIF for Google Slides.
- 2. Enhance the GIF quality using advanced technology.
- 3. Convert between the GIF and video file formats.
- 4. Available to Windows 11/10 and all macOS versions.
How to Compress, Crop and Trim a GIF for Google Slides
Step 1Open a GIF
Run the best GIF editor once you install it on your computer. Click the Toolbox tab at the top ribbon, and then choose the GIF Maker option. Then you will enter the add-file interface. Click the Add button in the Video to GIF section and add the source video. If you want to create a GIF from a photo series, such as converting PNG files to a GIF, click the Add button in the Photo to GIF section instead.
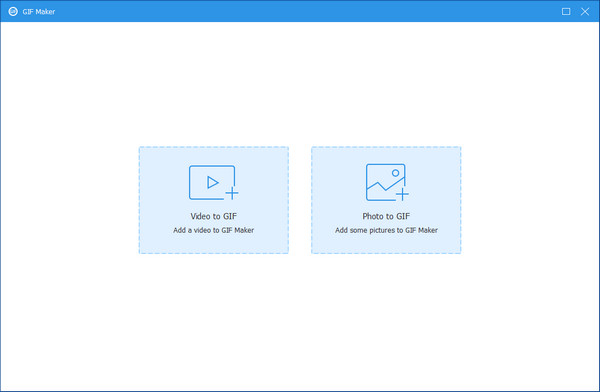
Step 2Edit the GIF
Next, you will see the main interface. To trim the GIF, click the Cut button, and set the new starting and end positions. You can also crop the GIF. Click the Edit button to open the editor window, and switch to the Rotate & Crop tab. Here you can remove unwanted areas from the animated image using the cropping box. The editor window enables you to rotate, flip the GIF, and more.

Step 3Export the GIF
Go back to the main interface after editing. Click the Preview button and check the GIF. Finally, fill in a destination folder in the Save to box by hitting the Folder button. As long as you click on the Generate GIF button, the GIF will be exported to your computer as you wish. Then you can insert it into Google Slides easily and quickly.
Don't Miss:
Part 3: FAQs about How to Add GIFs to Google Slides
Where to find GIFs for Google Slides?
You can go to imae.google.com and then search for a proper GIF with keywords according to your Google Slides topic. Make sure to select the Animated option to ensure that you get a working GIF for your presentation.
Is Google Slides free?
Google Slides has become a top PowerPoint alternative for a few reasons. Firstly, it is entirely free. Moreover, it's also very user-friendly, and it allows for super easy collaboration across people or teams.
How to access Google Slides?
Google Slides is Google's flagship presentation app that lives inside the browser as a part of Google Drive. If you have a Google account, like YouTube, Gmail, or Google Photos, you can access Google Slides with it directly.
Conclusion
Now, you should understand how to add GIF to Google Slides presentation. As more and more people work remotely, Google Slides and other cloud-based services become increasingly popular. To make your presentations engaging, you can add animated GIFs following our guide quickly. Plus, Tipard Video Converter Ultimate can help you create and edit GIFs for your Google Slides presentations.


 /
/


