How to Fix the Color of Videos Using 7 Professional Editing Tools Today
You may have a reason for learning how to color correct your videos, which is why you are here looking for the best solutions to use. For this reason, you must also remind yourself that making err is human, which also applies to video recordings that result in flawy vibrancy. In other words, to have an unpleasant video recording due to imperfect hues is normal. What is not normal is the utilization of a faulty video editor that will make your video in a worse condition. On the other hand, placing a click on this post means you trust our verdict on the solutions that we are about to present. It is why we assure you that not even one of the color correctors below will ruin your videos, and so you can give your hundred percent trust in this since professionals have gained their trust as well.
Therefore, to get directly on the content below, let us not delay this any longer. Introducing the simplified guidelines of the expert video editing programs listed below.

- Part 1. What is Video Color Correction
- Part 2. A Much Easier Way to Color Correct a Video on PC
- Part 3. How to Color-Correct a Video Using Premiere Pro
- Part 4. How to Use DaVinci Resolve in Correcting the Color of the Video
- Part 5. How Can Final Cut Pro Help in Video Color-Correction
- Part 6. How to Correct the Video Color with iMovie
- Part 7. How to Correct Video Color Using Sony Vegas CSGO
- Part 8. How to Use After Effects in Video Color Correction
- Part 9. FAQs about Correcting Video Color
Part 1. What is Video Color Correction
So, why do we need to color-correct a video? What is the correction of colors in the video anyway? A color or hue corrector is the tool responsible for setting the perfect radiance due to the video display. For example, if the shot has been too grayish due to the fluctuating range of your camera, then this corrector tool will work to do its job in making it radiant. In other words, if your videos are colorless, dull, and grey, then a color corrector needs to enter to make them look natural and lively. Perhaps you wonder how this tool works. Well then, this tool balances the black-and-white, exposure, contrast, and hues values of the video image display, making their look consistent.
From time to time, many people intertwine color correction and color grading to have the same apprehension. And yes, we cannot argue with this information since, as a rookie in video editing, you really could not tell which is which. For this reason, allow us to show you some of the differences between the two through a comparison table below.
| Correction | Grading |
|---|---|
| It is a process that comes first when it comes to editing the video color. | It is usually done at the end, for it is more on finishing touch. |
| It makes the video look more natural. | It doesn’t make the video look natural. It is more like a massive manipulation of the radiance. |
| It doesn’t involve the DP that much in color editing. | It involves and is synced by the DP. |
Part 2. A Much Easier Way to Color Correct a Video on PC
Having a video editor for color correction is painless, but the most powerful are usually challenging. Here is the much easier video editing software that perfectly blends with beginners like you without compromising excellent quality and procedure, Tipard Video Converter Ultimate. It is software that comes with a simple yet remarkable color correction feature within its Toolbox. This color corrector feature is the only one among the editing tools that work with Artificial Intelligence, making the procedure smooth and efficient. Furthermore, correcting tool functions to make your clip’s hue, brightness, saturation, and contrast natural and perfectly vibrant. Another good thing about it is that it allows you to edit on over 500 various kinds of formats and multiple devices. On top of that, this Tipard Video Converter Ultimate generously gives you many optimizations where you can optimize your output’s resolution quality, encoder, frame rate, and many more.
Moreover, this one-of-a-kind video color corrector lets you enjoy multitasking since you can also convert your videos, make movies and collages and enhance your output files while enjoying your task. Thus, we cannot disregard its user-friendly interface that even kids can navigate. And to give you a peak at this, please see the guidelines prepared below.
Step 1Launch the Video Editor
First and foremost, hit the Download button above and install the video editor on your computer afterward. Once you run the software, go to the Toolbox, one of the menus you see at the top of the interface. Then, select the Color Correction tool from among the options you see there, and hit the Plus icon in the popped-up window to import the video to correct.

Step 2Begin Correcting the Color
When the video is imported, you can start your video editing task. You may start by adjusting the brightness, saturation, contrast, and hue parameters below the preview section. You may freely adjust them continuously until you reach your desired outcome. All the changes you apply are seen in the preview section in real-time.
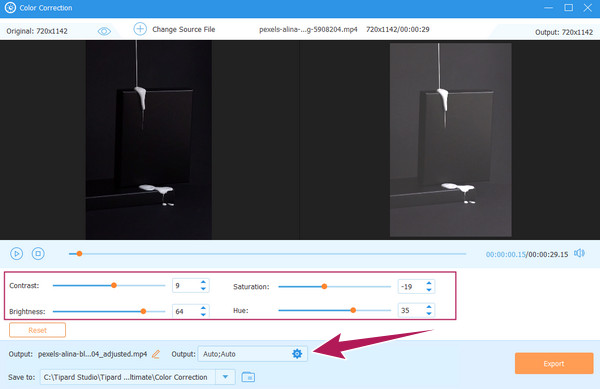
Step 3Adjust the Output Presets (Optional)
You have the option to edit the presets of your output, like the quality, resolution, and others. To do so, please hit the Coggle icon. Then, freely adjust the presets according to your preferences under the Video and Audio Settings sections. Subsequently, hit the OK button once done.
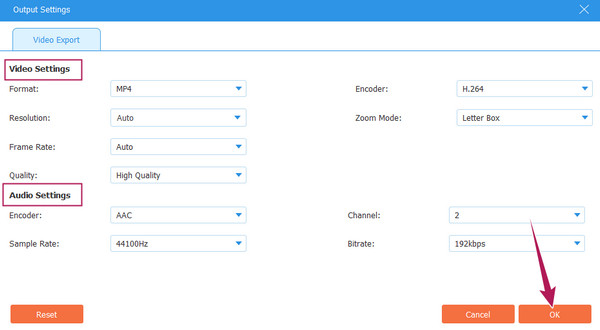
Step 4Destined the Color-Corrected Video File
After that, you are also free to customize the destination of your file output. How? Click the drop-down Arrow button at the end of the Save To option. Then, click the Browse and Select Folder tab to choose a folder from your local drive.
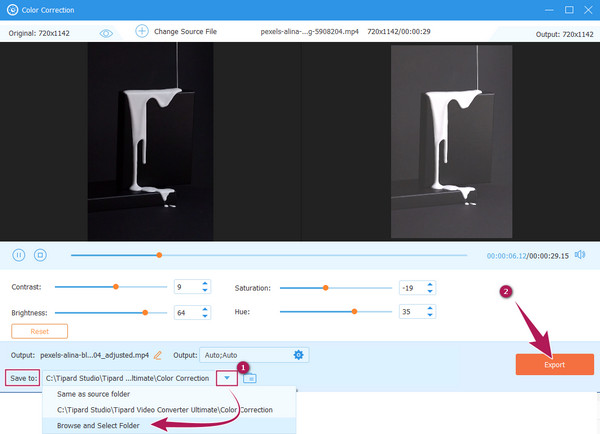
Step 5Export the Output
Lastly, hit the Export button at the bottom of the interface, as seen in the image above. Then, wait for the swift exportation process to finish, and check the file on your chosen file destination.
Part 3. How to Color-Correct a Video Using Premiere Pro
Premiere Pro is a video editing program developed by Adobe. It is a multi-platform video editing software with an excellent name for the ears of professionals. Many users who have experienced it cannot deny its robustness, although many say it doesn’t fit beginners. Its robustness especially applies to our topic, where the color correction of Premiere Pro using its Lumetri color panel and other technology can prove that. However, this specific tool still demands you and your customization techniques to meet a perfectly colorized video according to your needs.
Furthermore, this Adobe Premiere Pro also enables you to experience its excellent color grading ability along with its basic and advanced features you can use. On the other hand, below are the guidelines you can follow in correcting your video color using Premiere Pro.
Step 1Run the downloaded Adobe Premiere Pro software on your computer. Then, begin to upload the video file you need to edit. To do so, click the File tab and the Import button to get the video from your local folder. When the video is in, please place it in the Timeline section by dragging it there.
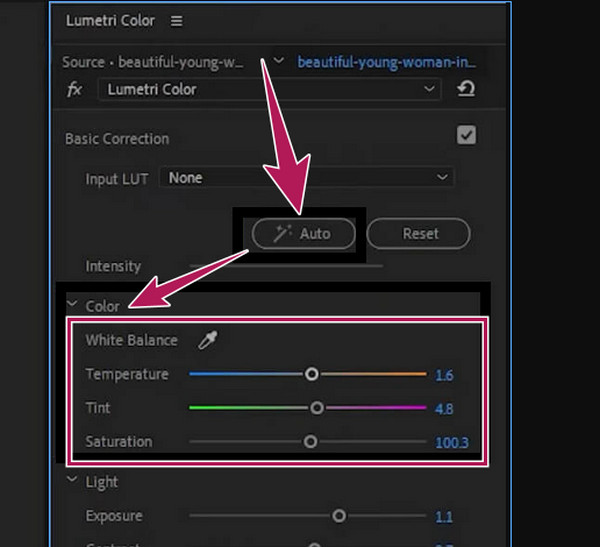
Step 2After that, you may access the Lumetri Color tool by clicking the Window tab. Then, hit the Lumetri Color option among the options to bring its panel.
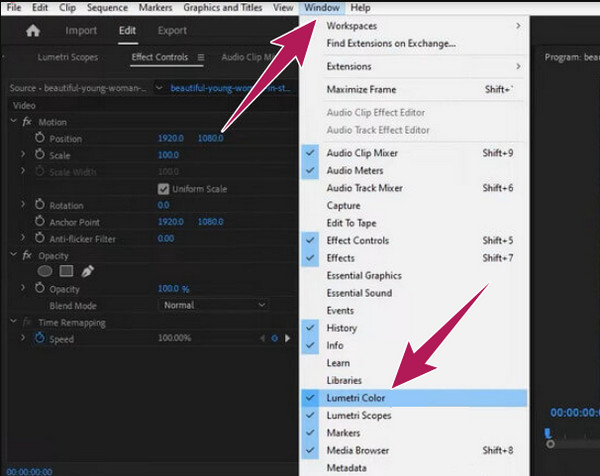
Step 3Once you open the Lumetri Color panel window, hit the Auto button beside the reset tab. Then, you may start adjusting the sliding options under the Color section, such as the Tint, Temperature, and Saturation. This will help you intensify the color of your uploaded video.
Step 4Finally, you can now save your color-fixed video by applying the saving process from the File menu.
Part 4. How to Use DaVinci Resolve in Correcting the Color of the Video
When it comes to correcting or fixing the colors of a video, DaVinci Resolve is one of the downloadable editing programs you add to your list. This software offers tools that can improve or even bring an exceptional display to your video file. Furthermore, it has an extensive luminance color space that works with patented DaVinci algorithms and GPU acceleration to process photos at 32 bits. Moreover, this DaVinci Resolve comes with extra key features aside from DaVinci Resolve color correction. Its key features are the Fusion Module, which quickly helps you create titles, animations, visual effects, and other editing modules. In addition, there are also multiple FX filters for lighting effects, picture restoration, blurring, styling, beauty, and the captioning tool for the generation of subtitles. And you can use DaVinci Resolve to reverse videos.
Generally speaking, DaVinci Resolve is a good software that everybody can utilize. However, those who are not yet an expert in video editing might find it overwhelming and challenging to use. With this in mind, allow us to show you simple steps showing the process of how to use DaVinci Resolve regarding color correcting a film or a video.
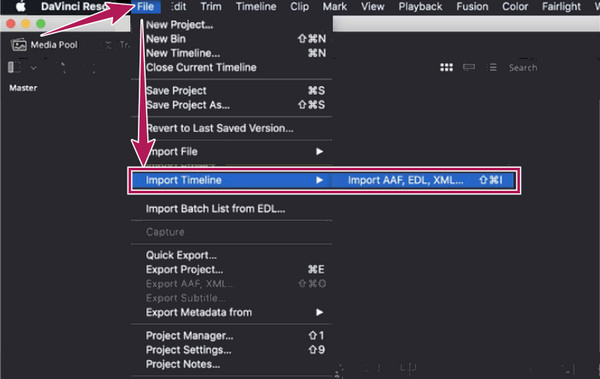
Step 1Download and install the software on your computer, and proceed to the importation of the video you need to edit. To do so, click on the File menu and hit the Import Timeline tab and bring in the video from your local folder.
Step 2When the video is already in the timeline, you can begin to edit its color. How? Navigate the Color Timeline and the Color Wheels options. This Color Wheels option will enable you to correct or even modify the colors in your video by adjusting the Gamma, Lift, Gain, and Offset presets.

Step 3After achieving the color correction you need, you may now save the video by clicking the File menu and then the Save Project As button.
Part 5. How Can Final Cut Pro Help in Video Color-Correction
This next part will present you with the Final Cut Pro. It is also one of the most amazing and powerful video editing programs with a feature that fixes the vibrancy of your video. Final Cut Pro is one of the best options for Mac users who are looking for a professional tool with an elegant-looking interface that will fit their device. Meanwhile, this tool has a Color Board function, where the interactions in color editing happen. However, you may find it easy and sound to interact with colors as professionals find the video customary of color correcting paradigms, but this may sound unfamiliar to beginners. Final Cut Pro’s color correction process is indeed a bit challenging for rookies, but with the steps given below, you will think about it otherwise.
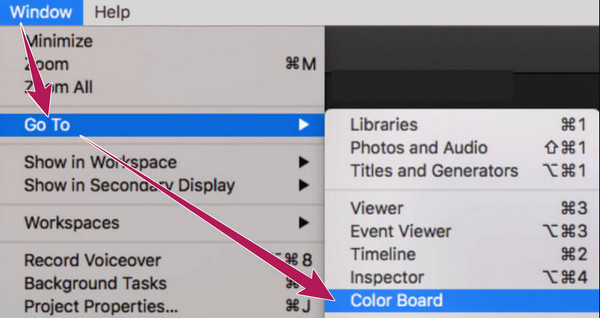
Step 1First, you must install Final Cut Pro on your Mac. Then, what you need to do after is to upload the video into the timeline and open the Color Board. To do so, hit the Window menu and, click the Go To button, then hit the Color Board button. Alternatively, you can go to the Effects portion, look for the Color category, and click it.
Step 2Once you access the Color Board panel, open the Video Scopes. Go and hit the light switch symbol, and choose the Show Video Scopes option shown in the new window. Afterward, go to the Settings option, and hit the Waveform tab.
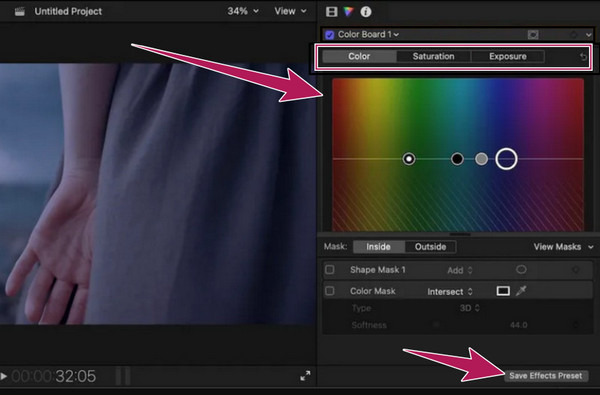
Step 3You can now freely navigate the video editor’s color correction on the Color Board panel by adjusting the color wheels in the user interface. Please focus on working with the three control presets: color, saturation, and exposure. Then, do not miss checking on your output, and proceed to save and export it.
Part 6. How to Correct the Video Color with iMovie
If you are using a Mac and do not like the idea of installing anything to it, then you can use iMovie instead. As everyone knows, iMovie is one of the aces tools of Apple when it comes to movie-making and sort of video editing. And as an Apple user, you shouldn’t miss the color correction in iMovie, for it is one of its remarkable capabilities. Furthermore, iMovie comes with multiple advanced presets where you can customize your video’s brightness, exposure, contrast, and saturation. In addition, this built-in program of Mac also offers settings where you can modify the green, red, and blue gains altogether, along with its enhancement and auto-denoise options. However, suppose you have already experienced how this iMovie works. In that case, you might already know how mysterious it is, especially with this particular task, due to the adjustments that you need to set perfectly. Nevertheless, iMovie is still one of the top picks of many, and to show you how this free video editor works on color correction, here are the steps you need to follow.
Step 1Launch the built-in software on your Mac, and upon arriving on its main interface, hit the Import Media Files tab to load the video clip you need to edit. Once it is uploaded, drag it to the bottom part where the Timeline is located.
Step 2When the video is visible in the Timeline, do right-click while your cursor is on the video. Then, select the Show Inspector option over the other selections and hit the Color Corrector symbol when you go to the preview section. After that, the adjustment parameters will pop-up up, which you need to adjust according to your preferences.

Step 3After applying the color correction to the video, you may save and export it. To do so, hit the Export symbol, as you see in the photo above. Then, among the options in the small window, click the Export File button and move to the following saving process.
Part 7. How to Correct Video Color Using Sony Vegas CSGO
Moving on to the next downloadable software that works remarkably on color editing on video is Sony Vegas. It is a non-linear editing system that is currently operated by Sony Creative Software. Unlike the previous video editing programs, you will notice that Sony Vegas seems outdated in its interface. However, this won’t change the fact that it is still one of the most sought-after tools for video editing and color correcting in particular. Sony Vegas (CSGO) color correction is something that you must watch out for. It contains a color wheel similar to others that can instantly correct colors. But we can never urge you to love it more, especially if you are a rookie in the video editing zone because it is one of those tools with a confusing interface. For this reason, the guidelines below will help you a lot if you want to try it for the benefit of the doubt.
Step 1Use a desktop and install this video editing program by purchasing it.
Step 2Then, launch it and proceed to import the video by clicking the File menu and the Open tab.
Step 3Then, hit the Video FX selection and choose the Color Corrector option at the left of the user interface. After that, a window will appear on the left, where the color wheels are placed. You can now begin to adjust them accordingly.
Step 4Subsequently, you can now hit the Save icon at the top of the preview section to export the edited video.

Part 8. How to Use After Effects in Video Color Correction
Finally, here comes the After Effects of Adobe. Again it is another excellent video editing program these days, and it is one of the best video editors that can balance video colors. Before you learn how to color correct in After Effects, let us first meet the tool that it uses. This tool enhances the colors of any of your video files, making them the best quality in terms of their display. After Effect actually offers several methods for color correcting in a video. Aside from that, it has additional features that will let you enjoy such as creating 2D characters, cartoons, animations, merging, 3D composition, simulation effects, motion trackings, keyframes, cutting, and more. However, similar to other tools that experts use, After Effects also comes with a grueling procedure. Hence, may the simplified steps below enable you to color correct the video you have.
Step 1Fire up After Effects on your computer, click the File menu, and then the Open button to upload the video. Then, hit the Pen icon on top and select the area of the video you want to correct.
Step 2Not hit the timeline composition and select the Color Correction followed by the Hue/Saturation button.

Step 3A new window will make its way where the color parameters are placed. Make time to adjust the settings until you reach your video's color correctness.

Part 9. FAQs about Correcting Video Color
Is OpenShot a video editor for color correction?
OpenShot is not purposely for color correction but comes with tools that will help you correct colors for the video.
Can I use the color-correcting function of iMovie on my iPhone?
Yes. iMovie app on iPhone has a tool to balance color, and you will find it when you upload your video in the timeline.
What is the best free video editor for color correction?
You can use an online tool if you are after a free tool. But if you are looking for the best, then use Tipard Video Converter Ultimate, for it also allows you to use its 30-day free trial while enjoying its best color-correcting tool.
Conclusion
There you have it, all the popular and powerful color correctors today. Each of them has their own identity and capability, but all of them are tried and tested to be the best in this task. However, if you want a tool that will not require expertise in video editing before using it, then you must pick Tipard Video Converter Ultimate.


