Eliminating Flicker: A Full Guide to Rectifying Flickering Videos
Flickering in videos can be a distracting and often frustrating issue for video creators and viewers. Whether you are a seasoned videographer, a content creator on social media, or someone trying to preserve cherished memories in digital format, encountering flicker in your videos can significantly detract from the viewing experience. Fear not! This guide aims to illuminate the path to flicker-free footage and fix flickering video, utilizing various tools and techniques to address and rectify this common problem.

Part 1. Introduction to Flickering Videos
Flickering in videos can stem from a multitude of sources. From incompatible frame rates and shutter speeds to lighting and electrical interference issues, understanding the root cause is the first step in fixing the problem. Flicker can severely impact the quality of a video, leading to eye strain, distraction, and diminished viewing experience. It can render professional footage amateurish and personal videos hard to watch. Sometimes, the equipment can be the source of the flicker, whether it is a camera, a light source, or even the electrical supply to which the equipment is connected. Sometimes, the issue may be with something other than the hardware but the software used to capture or edit the video. Incompatibilities or outdated software can often lead to flickering.
Part 2. Best Ways to Fix Flickering Videos
1. Tipard Video Converter Ultimate4
Tipard Video Converter Ultimate is comprehensive video conversion software that allows users to convert videos to and from a wide range of formats, ensuring compatibility across various devices and platforms. It is designed to cater to novice and professional users with its user-friendly interface and a robust set of features. One of its key features is video repair, which is designed to fix corrupted or damaged video files, making it a valuable tool for salvaging videos that may not play correctly due to various issues. This functionality broadens the software's appeal, offering conversion and editing capabilities and maintenance and repair solutions for your video library. Follow the steps below to learn how to fix video flickering using Tipard Video Converter Ultimate.
Step 1 Download and Install
First, get the tool by clicking one of the Free Download buttons below. After you download it, install it on your computer.
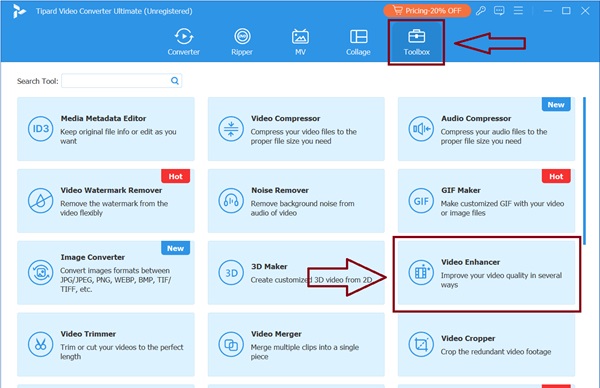
Step 2 Selecting Video Enhancer
Launch the Tipard Video Converter Ultimate after it has been installed. Find the Video Enhancer option in the Toolbox category of the main menu.
Step 3 Importing Videos
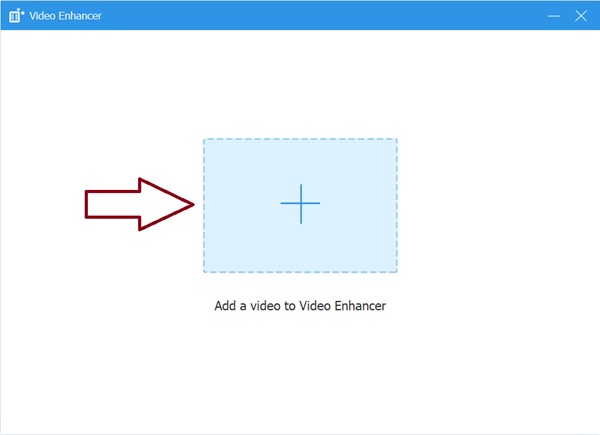
Now, click the + button or drag and drop files to import the videos you want to enhance. Browse to your computer and click Open.
Step 4 Enhancing Options
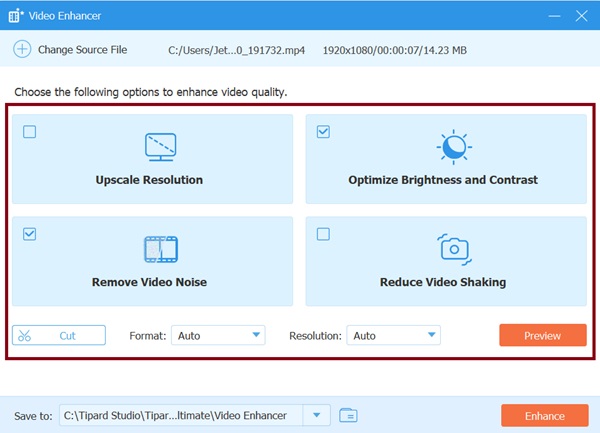
After importing the video, select the following options to enhance your video. You can choose one option or you can choose them all to enhance your video and remove the flickering in your video.
Step 5 Saving the Video
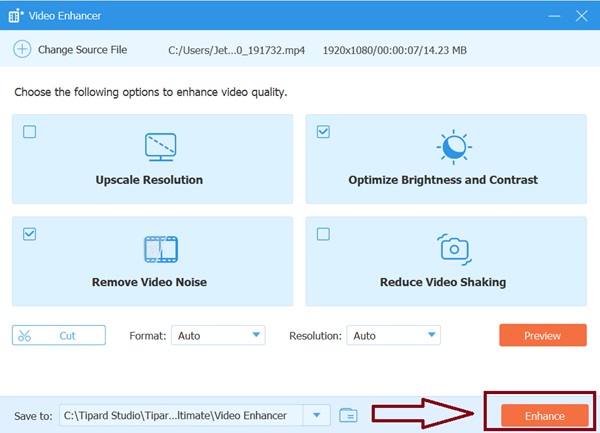
After deciding what options to enhance your video, click the Enhance button at the bottom right corner and click Okay once it is finished.
2. 4DdiG Video Repair
4DdiG Video Repair is a specialized software tool designed to address and rectify various issues plaguing video files, rendering them unusable or of poor quality. This powerful utility stands out for its ability to repair corrupted, broken, or damaged videos due to various reasons such as improper handling, storage errors, or issues during the transfer process. It supports many video formats, including popular ones like MP4, MOV, AVI, MKV, and more, making it a versatile solution for users with diverse video repair needs. One of its key features can fix flickering videos. To learn more about how to use this software, follow the steps below.
Step 1 Download and install the software on your computer.
Step 2 Launch 4DDiG File Repair on your Windows PC and click the Video Repair tab on the left side of the main interface. Then, choose Fix Video Errors and click the Start button under it.
Step 3 Click the Add Videos to Start Repair button and select one or multiple corrupted video files from your computer. Then click the Open button to add them to the repair queue.
Step 4 Once you have added the damaged video, click the Start Repair button to initiate the repair process.
Step 5 Wait for the software to complete the repair process. Once the repair is complete, you can preview the repaired video by clicking the View Results button.

3. HitPaw Video Enhancer
HitPaw Video Enhancer is a cutting-edge software designed to improve the quality of video files through advanced enhancement techniques. It targets users looking to upgrade their videos, whether for professional projects or personal enjoyment, by offering tools to enhance resolution, clarity, and overall visual appeal. This software is adept at upscaling videos, turning lower-resolution footage into high-definition (HD) or even 4K quality without significant loss of detail. Another notable feature of this software is fixing flickering videos, and it is designed to be accessible to users of any skill level. Learn how to operate this software by following the steps below.
Step 1 Download and install the software on your computer.
Step 2 After installation, launch HitPaw Video Enhancer. Upon opening the software, click Video Repair in the left-hand corner of the interface.
Step 3 Click the Eliminate Flickering feature and proceed by clicking the Fix Now button. After that, import videos by dragging the video to the interface.
Step 4 Once you import your videos, click Start Repair at the bottom right corner of the interface.
Step 5 After you repair the video, click the Complete List at the upper corner of the interface and click Export All at the bottom right corner to save the repaired video.

Further Reading:
How to Fix No Sound on iPhone Video Issues Conveniently
6 Effective Ways on How to Fix Blurry Videos Effectively
Part 3. FAQs About Flickering Videos
What app removes flicker from the video?
Filmora is an excellent choice for removing flicker from videos. It's a user-friendly video editing software that offers a wide range of features, including tools to fix common issues like video flicker. With its easy-to-navigate interface, Filmora allows you to enhance your video quality by correcting flickers, stabilizing shaky footage, and improving overall video appearance. Whether you're a beginner or an experienced editor, Filmora provides a straightforward solution to ensure your videos look smooth and professional.
How do you avoid flickering in video?
Auto settings on cameras can cause the shutter speed to fluctuate, leading to flicker. Setting your camera to manual mode and adjusting the shutter speed to match the lighting frequency can significantly reduce flicker. A good rule of thumb is to use a shutter speed that is a multiple of the light source's frequency.
How to fix a flickering video in Premiere Pro?
First, you must import your footage into Premiere Pro Project, create a sequence, and identify the flickering frames where flickering occurs. Then, apply the Brightness and Contrast effect to the flickering video clip, go to the Effect Controls panel, and tweak the Brightness and Contrast settings to minimize the flickering. Experiment with different values until you achieve a smoother look.
Conclusion
In the digital age, video content reigns supreme, but technical glitches like flickering can tarnish even the most professionally shot footage. Flickering in videos is a common issue that can ruin the viewing experience, making the search for a reliable solution paramount. Among the myriad of tools available, Tipard Video Converter Ultimate emerges as a beacon of hope for those plagued by this persistent problem. Not only can the Tipard Video Converter Ultimate help you how to fix zoom video flickering, but it also offers various essential tools in video editing.


